Loading coordinates from a text file |


|
|
The program downloads the coordinates obtained in the field conditions on geodetic instruments equipped with electronic processing means in format of the text file with dividers. Source files can be presented in various extensions (TXT, CSV, XYH, ...), the main condition is the divider between fields in a string. The structure of the file is defined so that one line corresponds to one spatial object. So, for the results of field measurements one line that contains the direct coordinates of the points (X,Y,H) corresponds to the picket point. Each line contains several fields with coordinates or a single field with a common coordinate description in WKT format. The result of the program's work is a map in format MAP, SIT, SITX, containing only point objects for structure of fields X Y H, or objects of any type for the structure of WKT format. Task is carried out by GeoImprt.dll module which is called through Run Application item of Tool menu or through Updating or Import from… items of the File menu. The program works in a dialog mode.
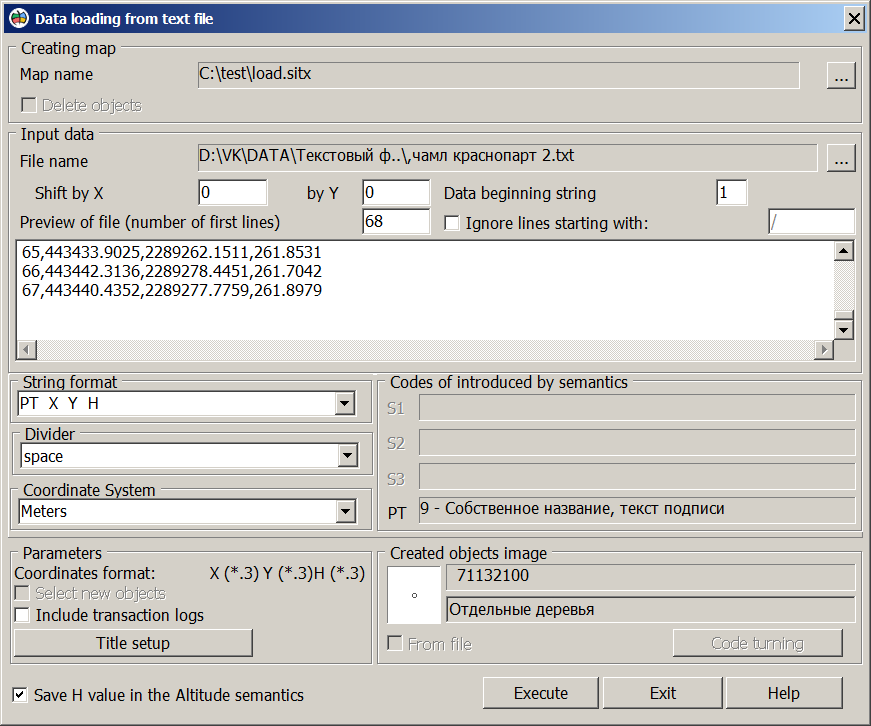
The dialog contains fields for displaying initial data and settings for performing the task. Initial data: - Access path and name of the input file containing data in text form received from geodetic instruments. - Fields for entering shift by X and Y, allowing you to place the created objects in the right place. - Line to start reading the file - you can skip the first few lines (for example, a comment) and start processing the file from the specified line. - At the bottom of the group there is a multi-line window used to view and analyze the contents of a text file, after which the user must decide on the option for processing the input file data. By default, the first ten lines of the file are displayed in the window, but you can specify a different number of output lines. Data for setting up the program to process the input text file, which is stored in the INI file of the open document: - String format selection (allows you to set and select the String format of the input text file). - Selecting a divider – a character that separates data in a line of a text file. - Choice of coordinate system. - Selecting codes of semantics introduced into the object. Additional parameters: - Selecting image of created objects. - Whether or not to store the height value in the object's semantics. - Title setup. - Ability to select created objects. - To include the transaction log or not.
Processing of the initial data should be constructed as follows: 1. At Import from text file create the user map (the button is on the right). 2. Choose an input text file (at Updating a map the input file is chosen before start of a task), thus contents of a file at once will be shown in a multilines window of dialog. If necessary, set the shift of coordinates. 3. Having analysed structure of a file you can choose String format and Divider. If necessary to choose a code of necessary semantics (the corresponding edited window near to a designation of a code of semantics from a string format). 4. To choose coordinate system of a text file (Meters, Degrees of 1942, Degrees of WGS); 5. Choose a name of a target map if it is necessary (by default objects will be created in a background map from which the task has been started). 6. If in an input text file there are codes of objects it is possible to adjust them - Code turning button (if the file of turning of codes is not present, then by default the objects will be mapped by a system code: Marking of point). If in an input file there are no codes it is possible to choose image of created objects. For this purpose it is necessary to disconnect From file button and to choose object, having pressed on the image of object or its name. In addition, you can create a linear object by coordinates from one file (for this purpose it is necessary to activate the Linear objects button). 7. If it is necessary to add titles to created objects it is necessary to set up titles. 8. To start the task onto execution - Execute button.
|