Quick Editing |


|
|
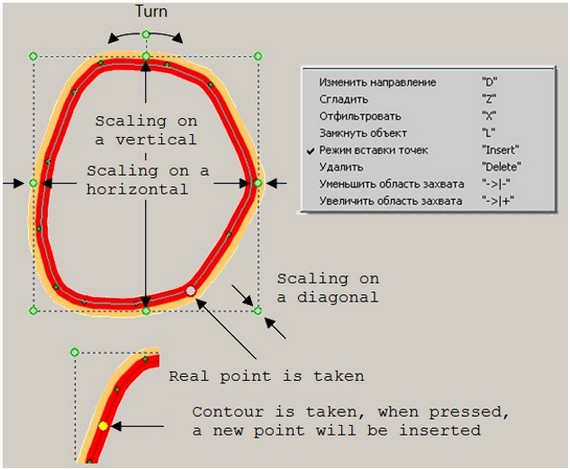
At a cursor moving, the nearest object is highlighted. After activating the edited object (single mouse click), the border frame (for linear and polygon objects) and the object's metric points are highlighted. Border frame has 9 points. 8 (on a contour of a border frame) - for scaling and one (above the northern edge of the border frame) - for object rotation. At cursor approach to one of border points (the radius of the point capture area is customized in the Editor parameters dialog and can be changed by pressing the keys «+» and «-» on the right additional group of the keyboard's keys) a "taking" of the point occurs, thus it is highlighted. After taking the point, you can click the left mouse button and by moving the mouse make a scaling or turn. When the object rotates, the center is the center of the frame. At scaling - the point of the frame opposite to the selected one. When you take a corner point, scaling is performed in all directions. When you take a side point - only by the width, the top or bottom point - only by height. The changes are recorded after the left mouse button is released.
At moving a cursor above the contour of the object, a taking the real points of the metric occurs, and if the insertion of points is enabled, then a taking the contour of the object between the real points take place. Thus, the place of taking is highlighted. If at this moment you press the left mouse button - the point insert in a place of taking and the object's recording will be executed, the inserted point will be highlighted as a real one. Next (without releasing the left mouse button) you can perform its positioning. Positioning the real point is done by moving the mouse with the pressed left button after taking the edited point. If you press the «Ctrl» key, the current point will be copied, the «old» point will stay a current one. For digitization (continuation) of a linear object, you can set the cursor to its beginning, press «Ctrl» and make addition and positioning of the necessary number of points. When moving a point, it "sticks" to the points and contours of objects already existing on the map (within the radius of the taking area). To disable this feature, set the taking radius to 0. The cursor position at the moment when a taking the point or contour is absent, activates the editing mode of the object as a whole. If clicking the left mouse button and cursor moving leads to moving of all object, moving with the pressed «Ctrl» key will lead to creating and moving a copy of object. Pressing the «Del» key will delete the object, etc. Modes of «hot» keys available for editing: Conformity of keys is shown «Default». You can make your own customization of the conformity in the dialog of the Map Editor Options in the «Hot keys» bookmark.
To proceed to activate and edit the next object, press ESC.
| ||||||||||||||||||||||||||||||||||||||||

